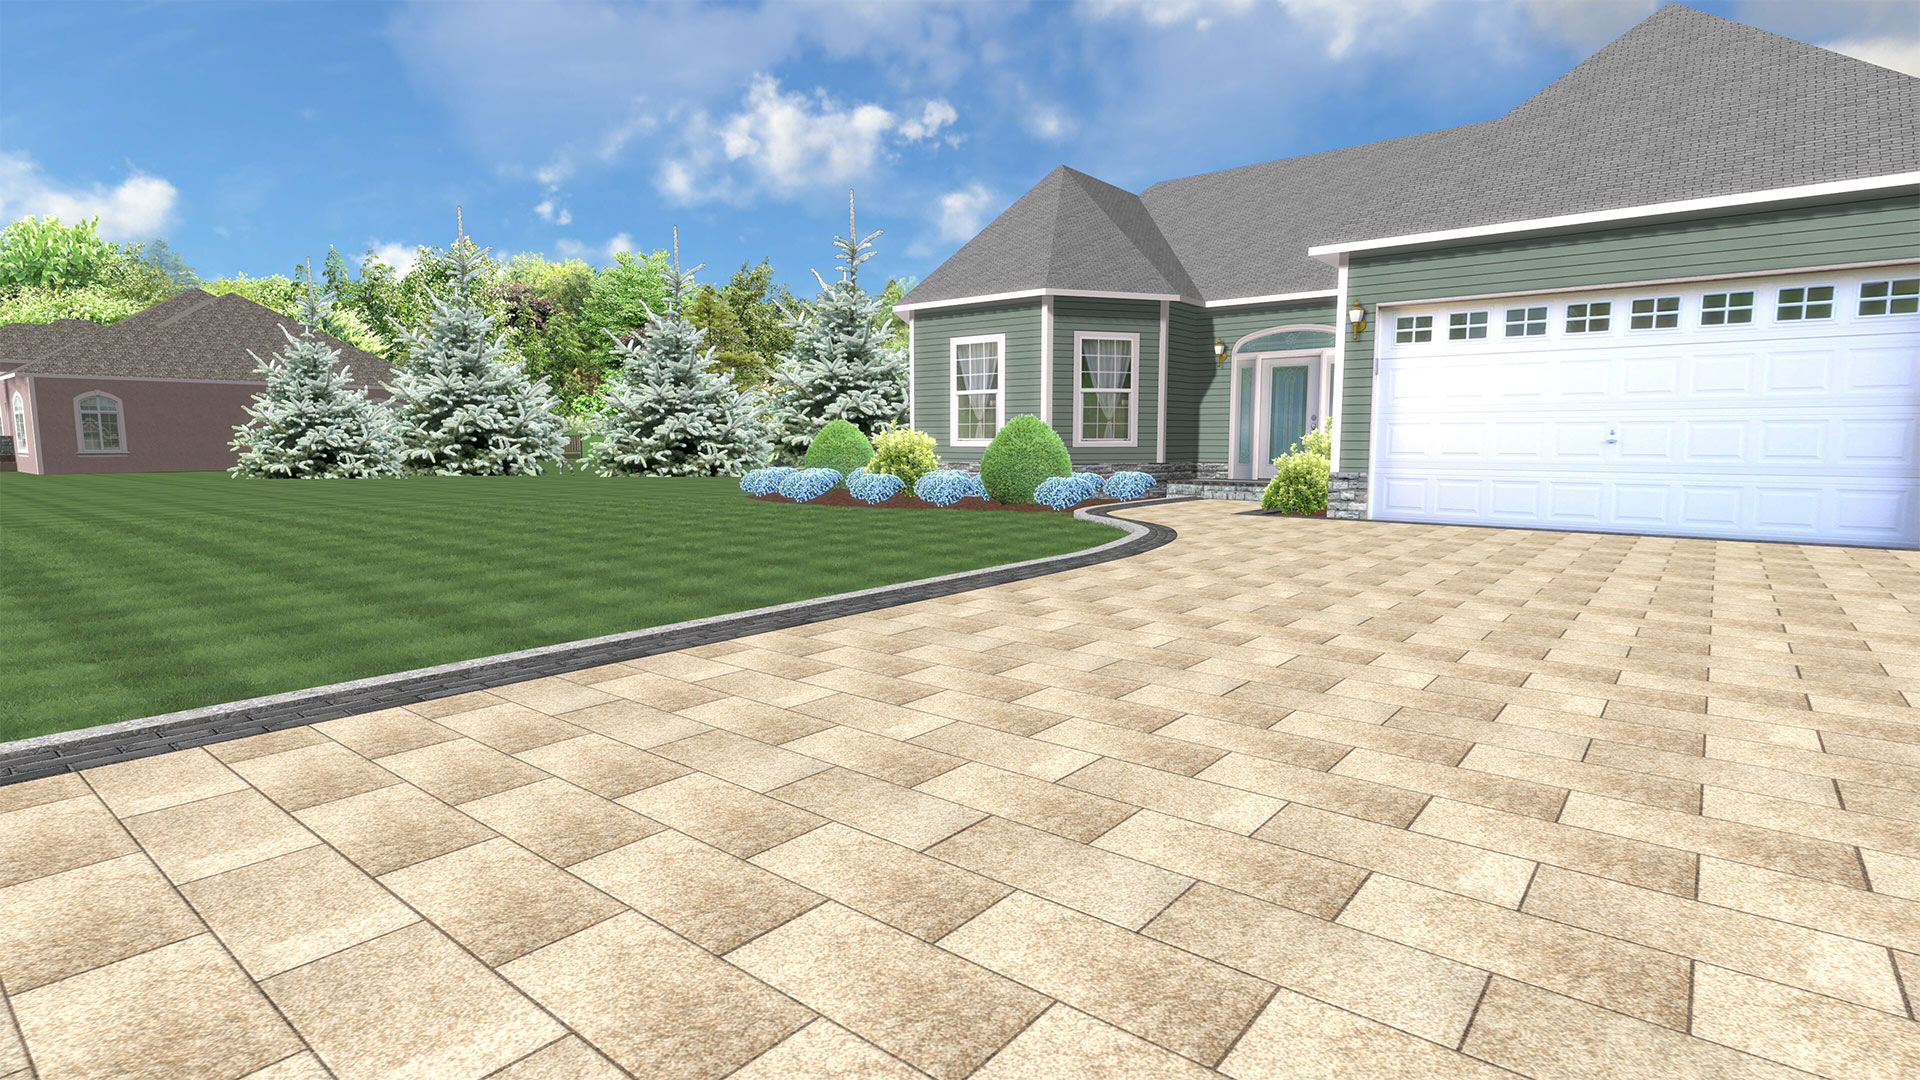
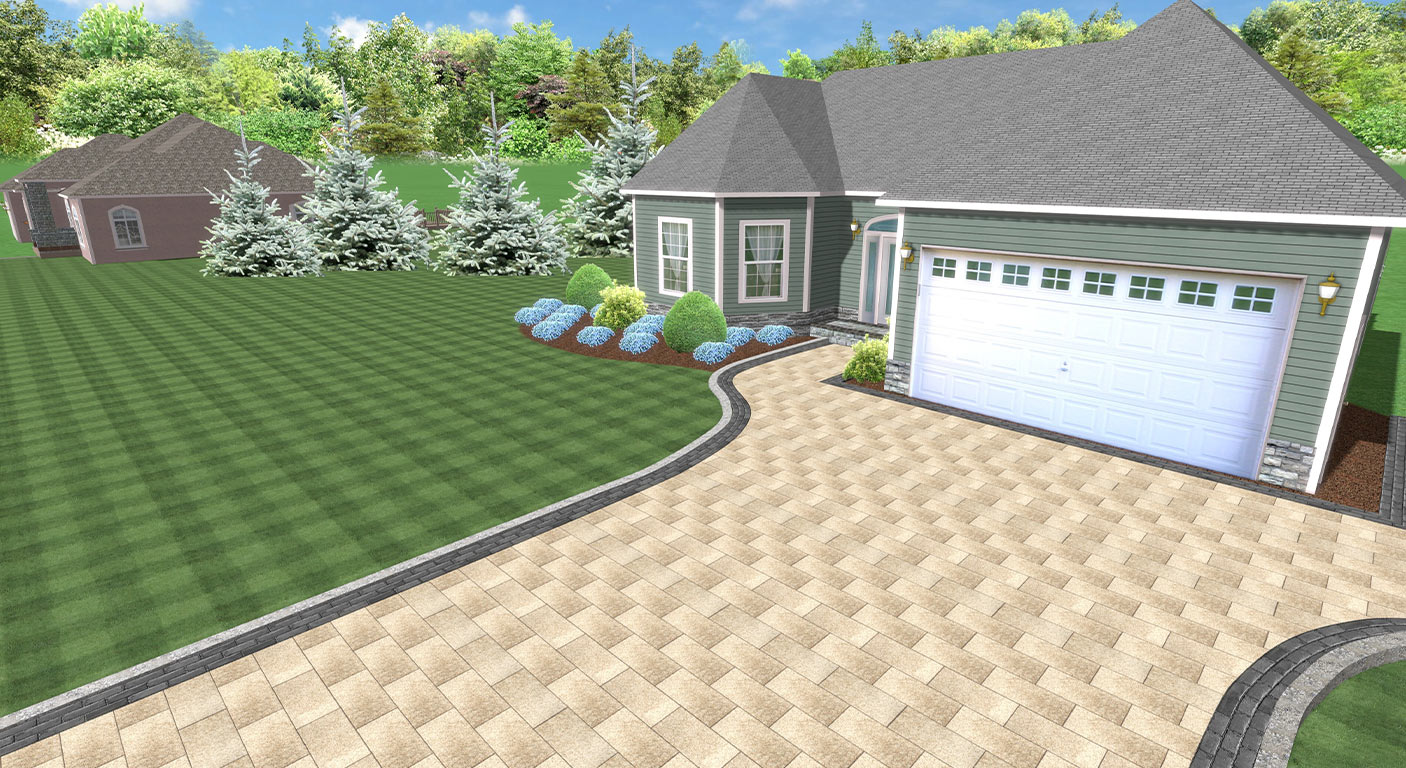
How to Build a Paver Driveway
This guide will take you through the step-by-step process of building a driveway with Unilock pavers.
How-to Guide PDF Version:
- Excavate subsoil
- Pour concrete curbs (if part of plan)
- Compact any loose subsoil with compactor
- Place DriveGrid (overlap of 12″ required when joining segments)
- Place Filter fabric on sides of excavation (prevents base from clogging)
- Place 3″ of gravel over DriveGrid and compact (min 3 passes)
- Place another 3″ and repeat until all base is in and compacted
- Screed bedding course using steel pipes. Do not walk on after screeding
- Lay pavers directly on bedding course
- Cut pavers to fit where required
- Restrain edges with plastic, metal or cement wedge
- Lay sod or seed grass up to edge.
- Compact surface of pavers (3 passes)
- Install jointing sand
- Sealing (optional)
IMPORTANT: For the personal safety of everyone on site, be sure to have all underground utilities located and clearly marked prior to excavation.
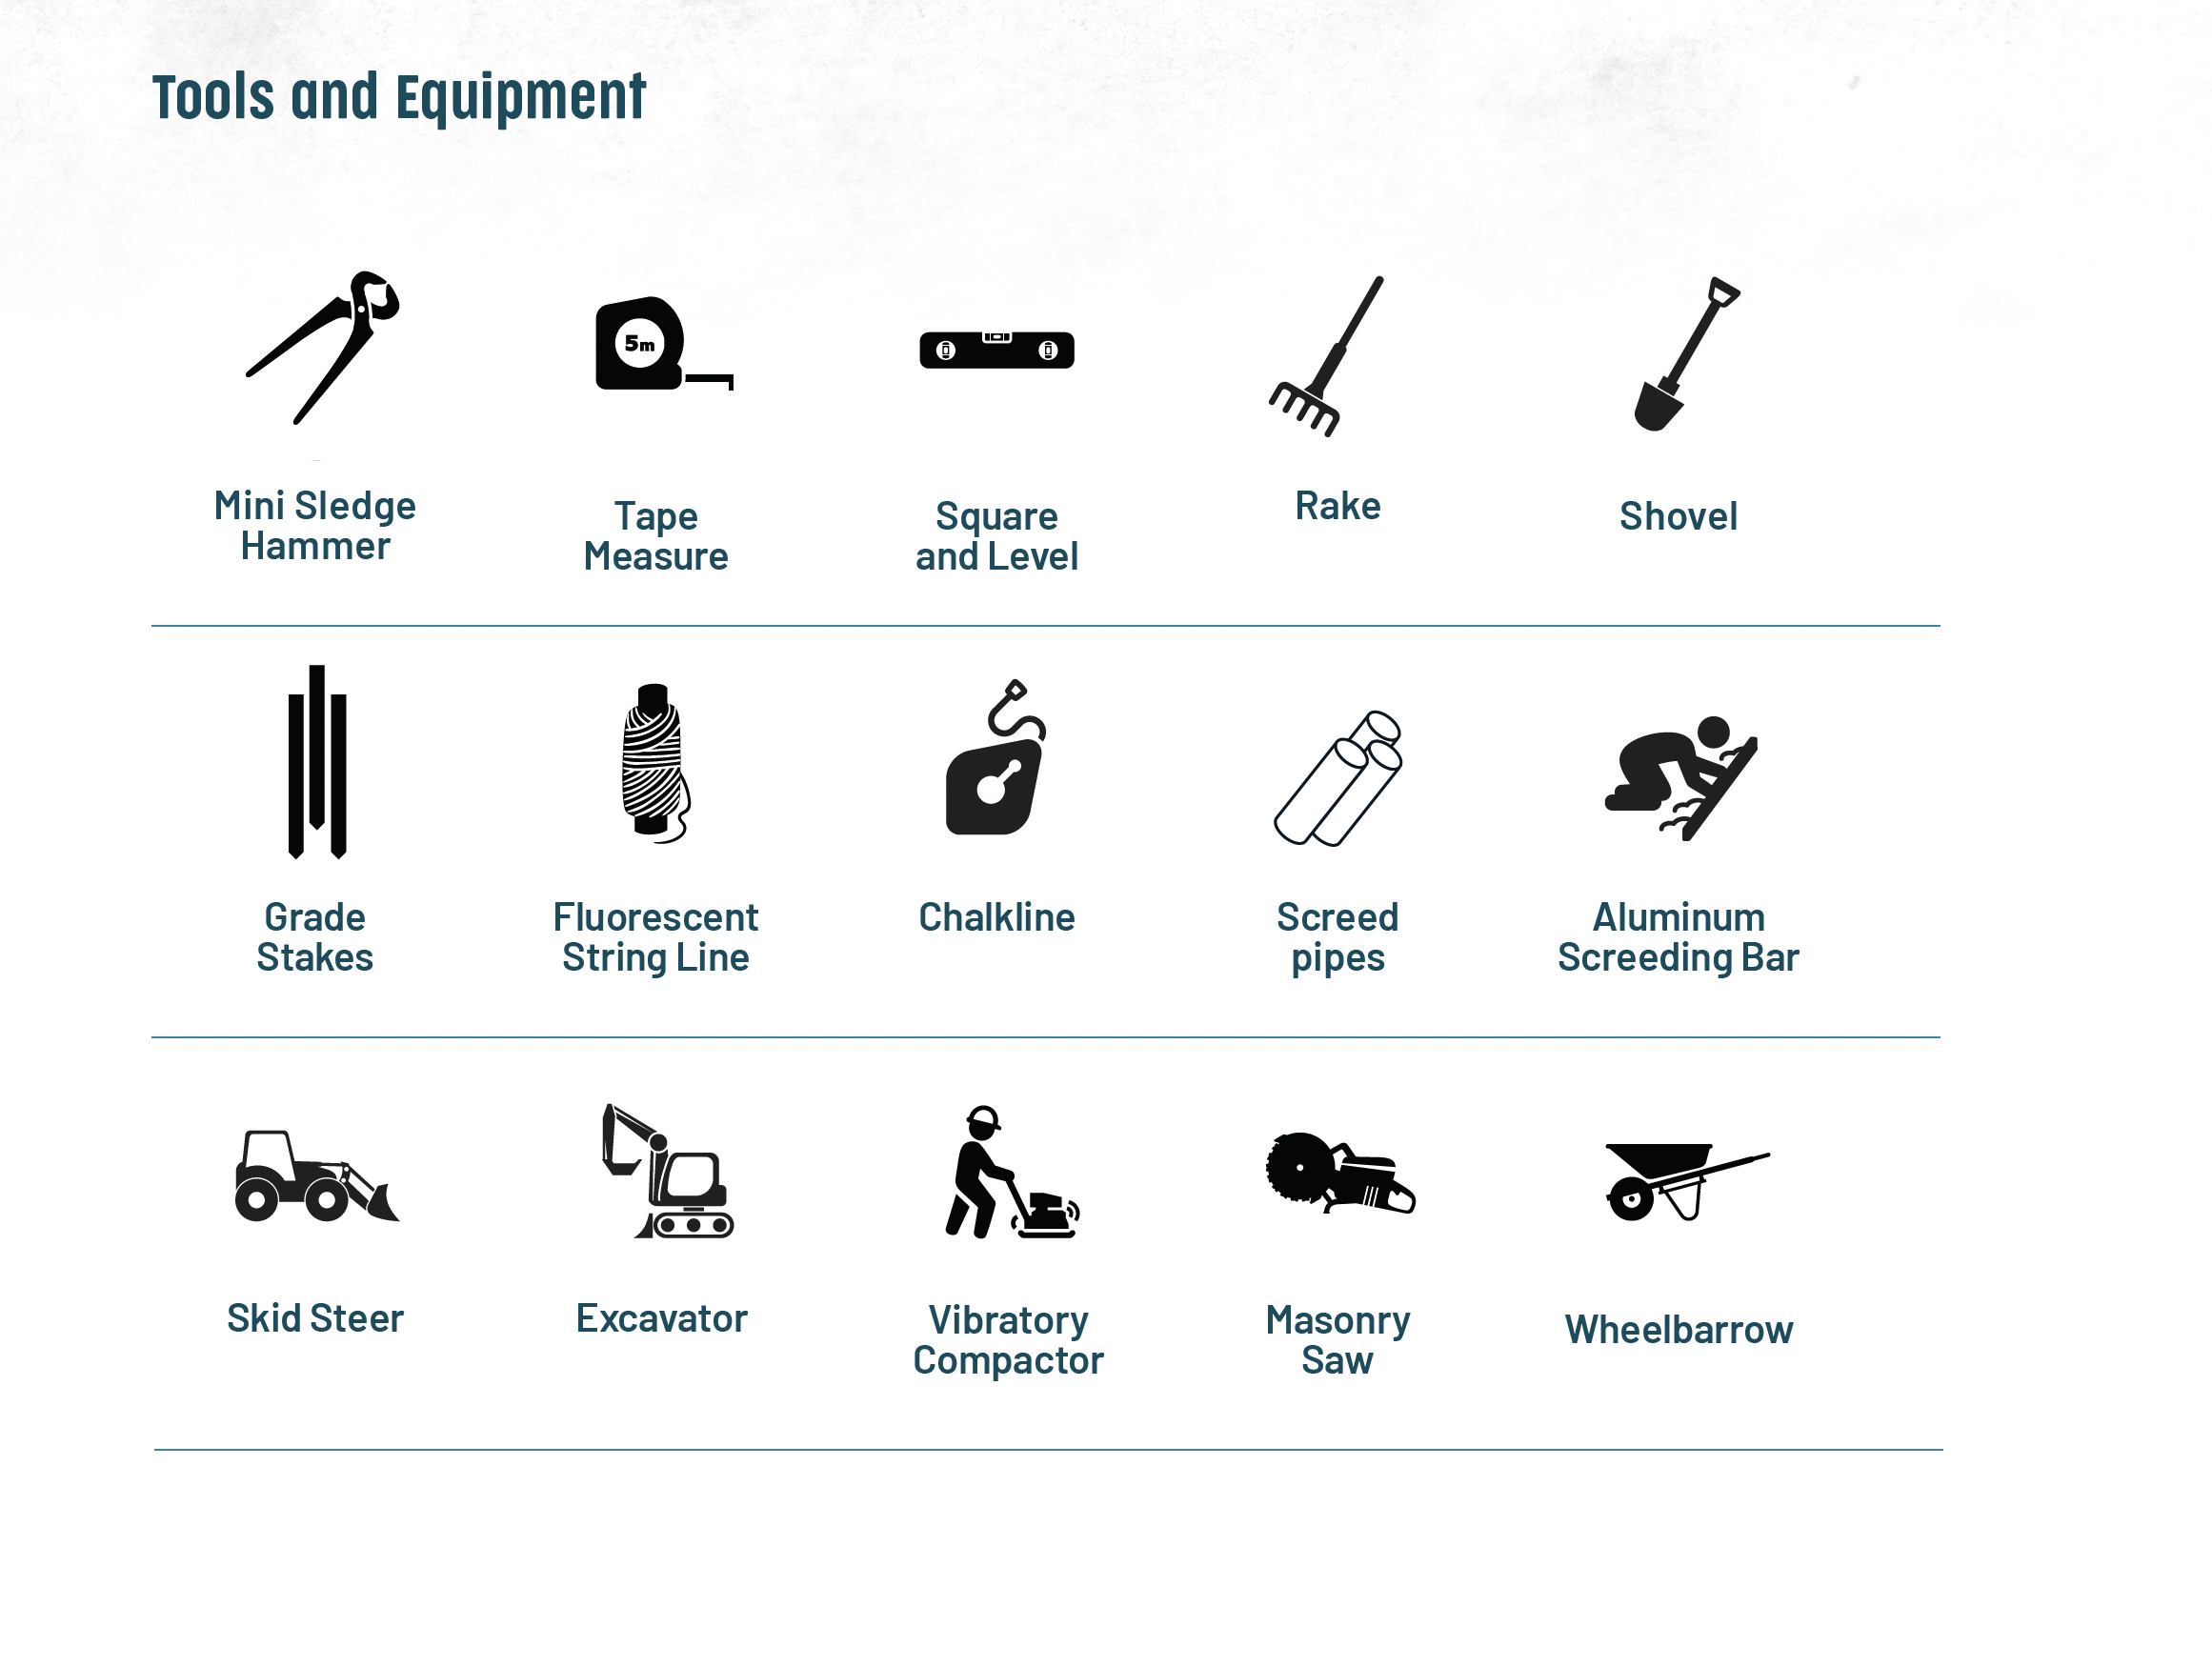
- Tools and Equipment
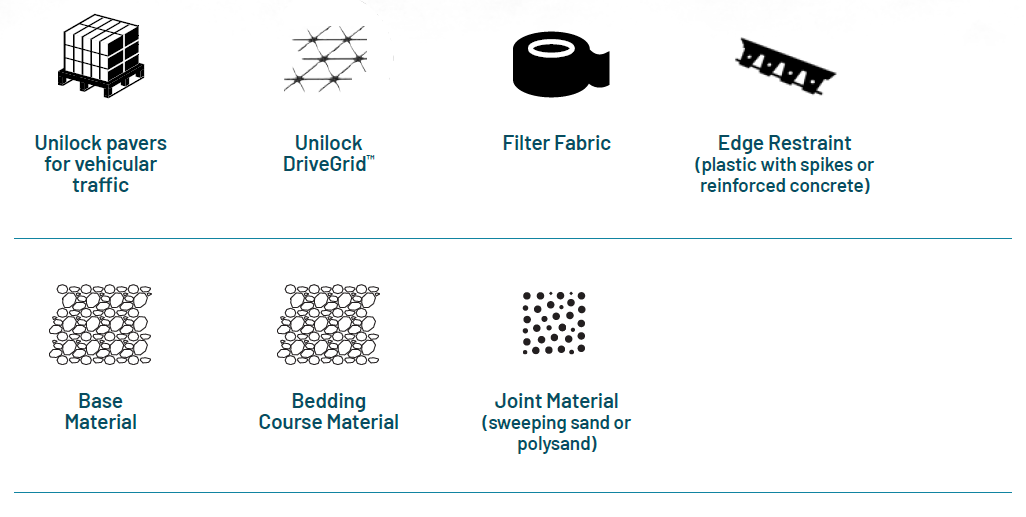
- Construction Supplies
- Before Starting
- Design
- Base Material Types
- Excavation
- Base Extension
- Base Installation
- Bedding Course
- Bedding Course Installation
- Preparing to Lay the Pavers
- Installing the Pavers
- Cutting
- Installing Pavers of Varying Heights - Thick
- Installing Pavers of Varying Heights - Thin
- Edge Restraint Types
- Concrete Curb
- Plastic Edge Restraint
- Reinforced Concrete Edge Restraint
- Paver Compaction
- Joint Sand
- Installing the Sand / Sealing
- Congratulations - your driveway is complete!
1. Tools and Equipment
2. Construction Supplies
3. Before Starting
A well thought-out design combined with proper planning, will ensure the installation proceeds smoothly and helps ensure a quality installation. Pre-ordering materials and staging the jobsite will also help ensure that your project will move along smoothly.
- Order Unilock paver products
- Arrange a utilities “locate” before excavation
- Order bulk materials (base material, bedding material)
- Check with local municipality for any required permits
- Order accessories (DriveGrid™, edging, jointing sand)
- Inspect site to identify possible challenges or obstacles
- Plan jobsite layout and progression
Driveway design is just as important as patio design.
- Maximize the size of the driveway as much as the property will allow, while ensuring that the scale of the driveway doesn’t visually overwhelm the house.
- Allow for 16 ft to 20 ft opening into the walkway leading to the house.
- Choose a main paver that complements the house, not match the house.
- Choose a border stone that matches trim and/or the roof color.
- Make the border width proportional to the house size. A large house can handle a wider, more elaborate border combination.
- Choosing field and border stones that are the same thickness isn’t necessary, but it’s recommended in order to save time on the installation.
To learn more about Driveway design check out our UTEC Certificate course
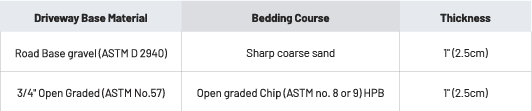
5. Base Material Types
There are 5 common base types that are used in the installation of driveways, patios and walkways, each with their own unique advantages and disadvantages. Although the Traditional Gravel Base method has been used for decades, Permeable Base has gained in popularity and is becoming more of the standard because of ease of use, and performance. Method #3 is a unique hybrid of the first two.

1. Traditional Gravel Base
⅝” Minus Road Base Gravel – ASTM D 2940 + Sand Bedding
- Advantage: Time tested system
- Disadvantage: Drains slower, requires a lot of compaction
2. Permeable Base
¾” Clear or ASTM No. 57 + ¼” Open graded stone chip (HPB or ASTM No. 9) Bedding
- Advantage: Time tested, less compaction required, good for working in rainy weather which extends working season
- Disadvantage: Slightly more expensive materials
3. Traditional Gravel Base Hybrid
⅝” Minus Road Base Gravel – ASTM D 2940 + ¼” Open graded stone chip (HPB or ATM No. 9) Bedding
- Advantage: Time tested system plus a more workable bedding
- Disadvantage: Requires a lot of compaction
These last two methods are less popular and therefore are not specifically covered in this How-to Guide.
4. Direct Overlay on Concrete
(Specialty installation as specified by hardscape professional or engineer). Typically used in climates with minimal freeze thaw concerns.
- Advantage: Good for working in any weather. No compaction required
- Disadvantage: Pavers cannot be compacted to flatten the surface; very reliant on the quality of concrete finishing
5. Direct Overlay on EPFB
(Expanded Polypropylene Foam Board) GatorBase or Equivalent. Install as per manufacturer’s directions. Do Not use for driveways.
- Advantage: Less excavation, portability in tight residential areas
- Disadvantage: Not suitable for driveways, subsoil must be able to drain to avoid frost movement
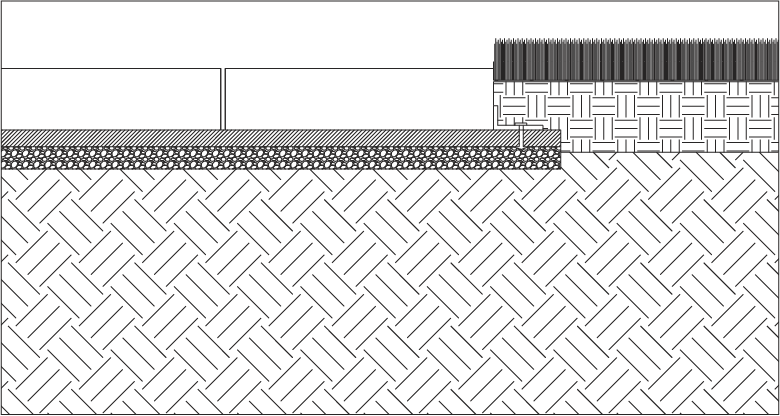
6. Excavation
In order to determine how deep you need to excavate, you need to assess the subsoil type. Refer to our YouTube video on this subject to learn how to do this. Using Unilock DriveGrid™ on your project can significantly reduce the depth of excavation that is required, saving time and the cost of base material, while improving stability so that settling and ruts won’t occur over time.
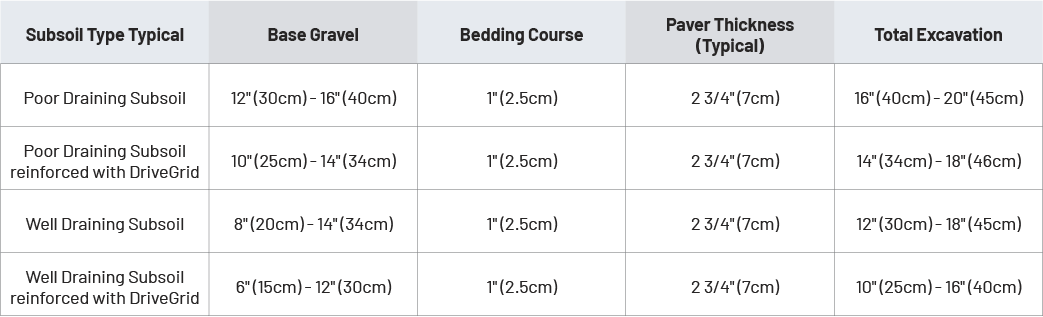
Knowing the site soil type and drainage properties will help determine excavation and base depth. The use of Unilock DriveGrid can significantly reduce the depth of excavation and thickness of base material required, while adding stability to the driveway to prevent settling and rutting.
TOTAL EXCAVATION = 2 3/4 + 1 + 12 = 15 3/4″ (39.5cm)
7. Base Extension
When excavating, ensure that the area extends beyond the edge of the driveway pavers by 6-8″ (15-20cm). This will improve the stability of the driveway’s finished edge and will provide room for the installation of edge restraint.

Areas requiring a pre-cast curb require additional excavation so there is a minimum of 6” of gravel under the curb. Compact this gravel base and any surrounding soil that was loosened as a result of excavation using a compactor.
When pouring the curbing, ensure that the curb is perpendicular to the main structure and that it is precisely straight.
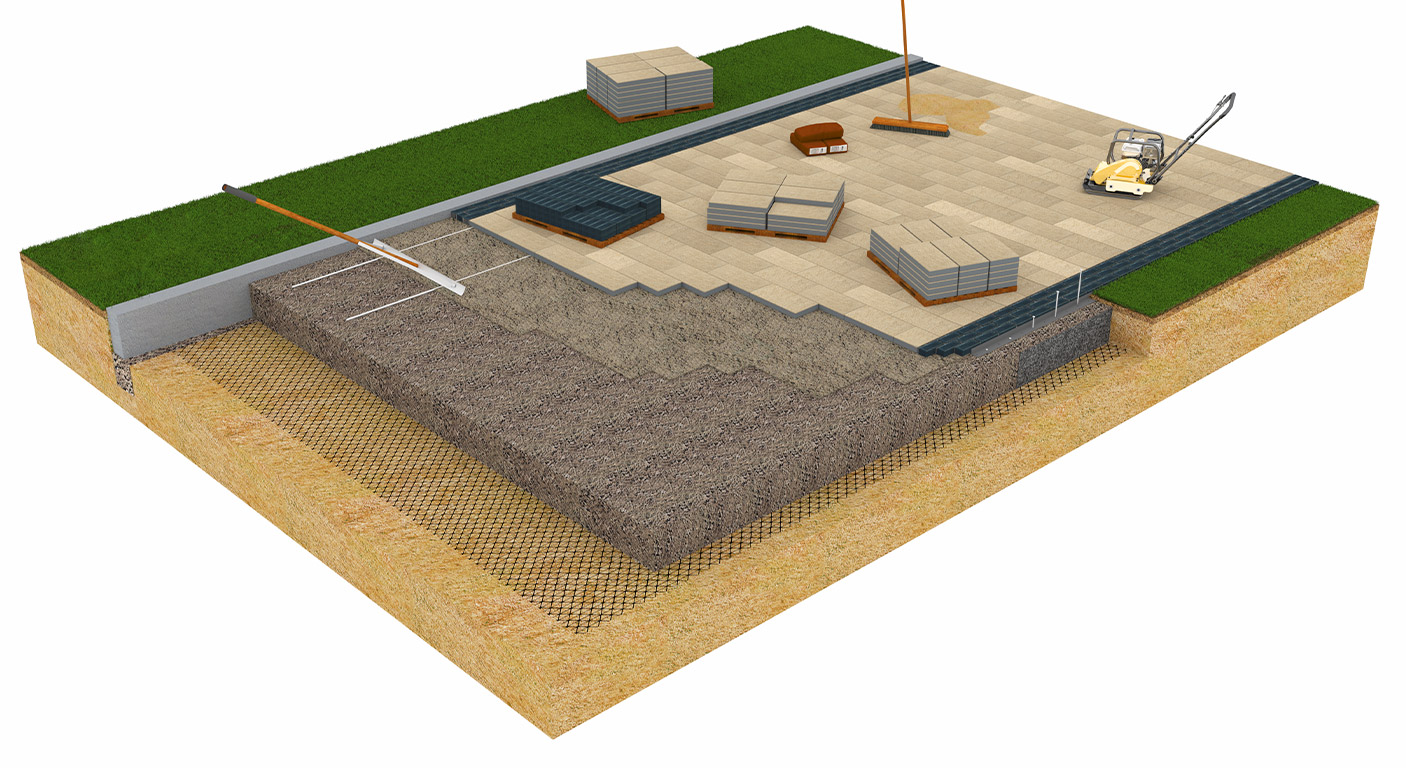
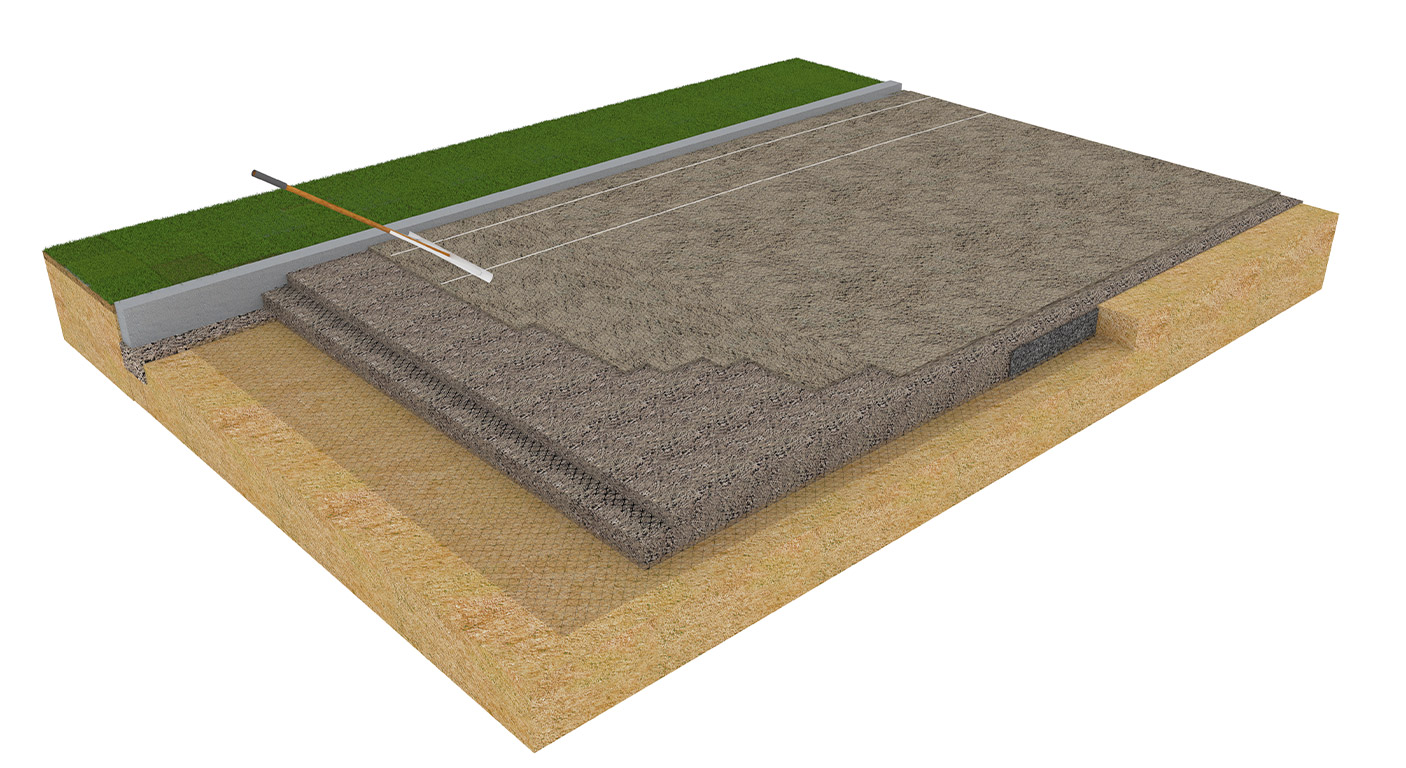
8. Base Installation
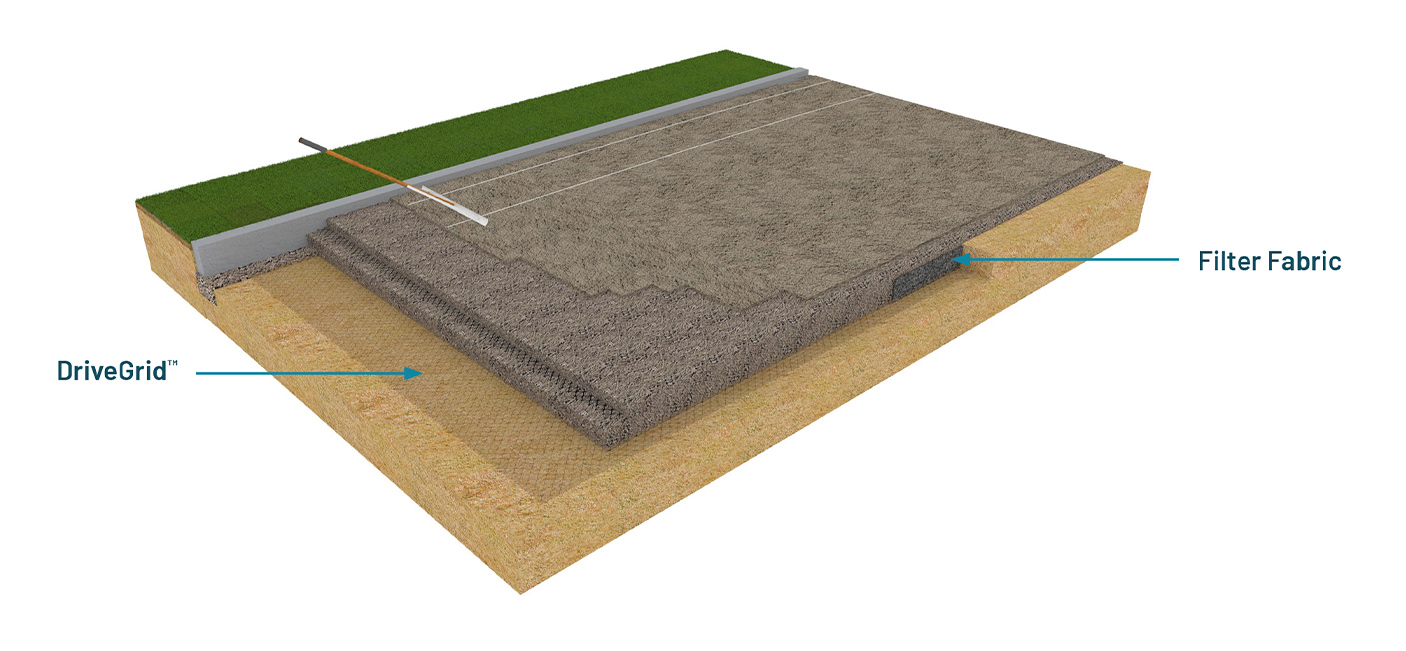
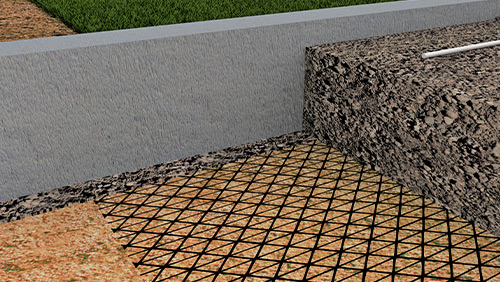
- Step 1: Place a layer of DriveGrid directly over the subsoil. This will stiffen the gravel layer which helps prevent rutting. Ensure that each section of DriveGrid™ overlaps the next by 12″ (30cm).
- Step 2: Place filter fabric on any vertical edges abutting soil.
- Step 3: Spread 3-4″ of gravel base material. Use only road base gravel (ASTM D 2940), or for a permeable base use ASTM No. 57.
- Step 4: Compact the gravel with a minimum of three passes using a reversible plate compactor with a driving force of 10,000 lb.
- Step 5: Place a second layer of DriveGrid before installing the next 3-4″ layer of base material so that it is sandwiched approximately half way up the total depth of the base.
- Step 6: Compact this second layer using the same method from step four. Repeat with a third layer of base if needed to reach the desired height and compact.
- Step 7: Screed or rake the gravel, following string lines to achieve the proper slope.
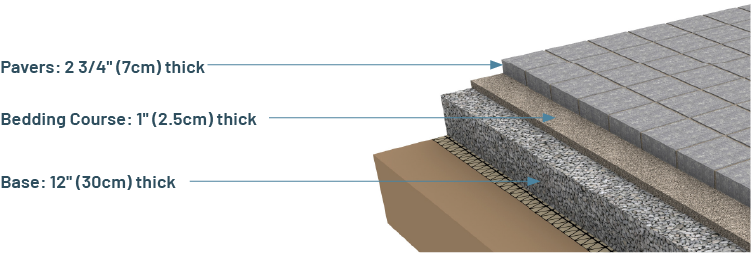
9. Bedding Course
The bedding course should be 1″ (2.5cm) thick, unless otherwise specified by an engineer. However, the material will change based on Base Material Type.
NOTE: Do not use limestone screenings, mason’s sand or slag. These materials do not drain well due to a high concentration of fines which, when they become wet, will cause ruts to appear in the driveway.
10. Bedding Course Installation
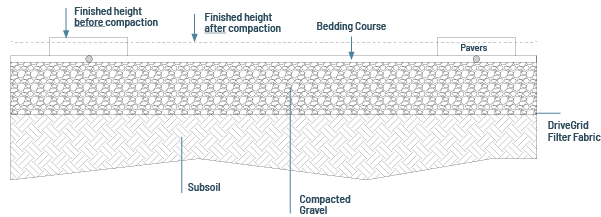
- Step 1: Place 1″ O.D. pipes directly over the compacted base. The pipe height is critical because it determines the final installation outcome. Pipe height should be ½” above finished height for sand bedding and ¼” if using chip bedding.
- Step 2: Screeding should be done with a straight board, aluminum bar or wide screed rake. The wide screed rake is the easiest and most efficient to use. Once the bedding material is level with the pipes you are using as a guide, you can remove them and carefully fill in the grooves that are left behind. Do not walk on the final screed.
11. Preparing to Lay the Pavers
- Step 1: Not all pavers are appropriate for driveways. Make sure the Unilock pavers you select are recommended for vehicular.
- Step 2: Check the bundle tags on the pavers as soon as they are delivered to the site to ensure that they match your product selection.
- Step 3: If you have ordered multiple bundles, ideally they will all be from the same production run. You can check this by comparing batch numbers on the bundle tags. If they are not from the same production run, there may be minor color variations between the bundles. You will need to manage this by making sure you draw product from both batches as you are installing the project to achieve a pleasing color blend.
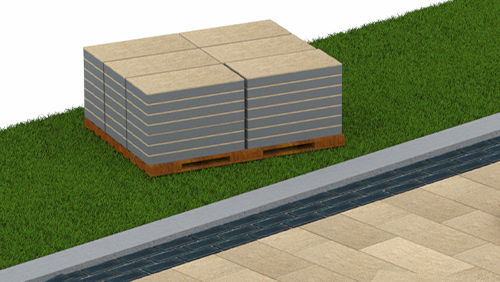
- Step 4: Place paver bundles as close to the installation as possible.
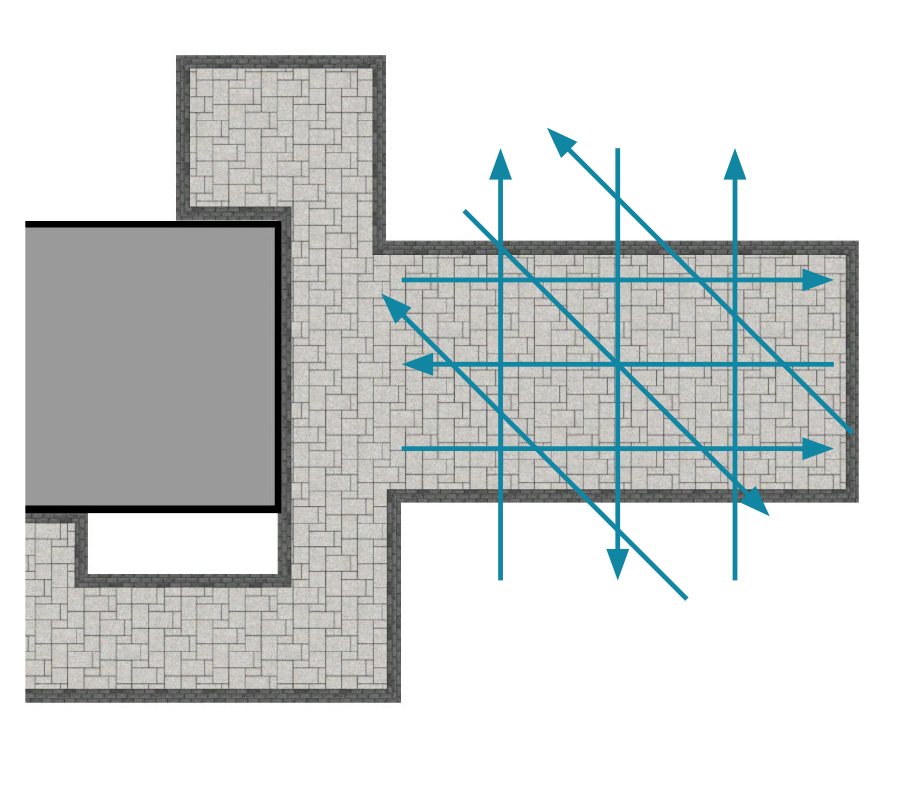
12. Installing the Pavers
- Step 1: Unless your design calls for an alternate angle, begin by installing pavers at the garage, perpendicular to the home. This will create a pleasing appearance and will
prevent small sliver cuts where the pavers meet the garage floor. If your design calls for a border, this first row may be with your accent border stone.
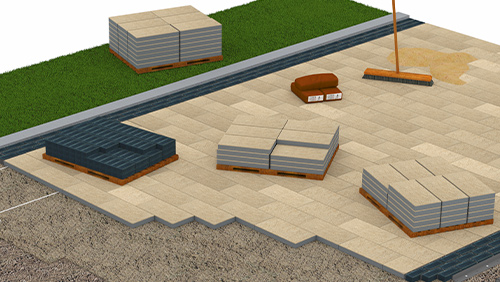
- Step 2: Continue to lay the main pavers in the desired pattern. Laying patterns are available for download at unilock.com.
- Step 3: Ensure you are drawing pavers from multiple bundles to ensure good color blending.
- Step 4: Once a large enough area has been laid, pallets of pavers can be placed on the surface near the working edge. Use a pallet jack for this. Do NOT drive on the surface with a skid steer unless the surface is sufficiently protected to prevent scuffing and rutting.
- Step 5: Continuously check the straightness of your installation with a string line. Snapping a chalk line right on the bedding material is a great technique to maintain alignment.
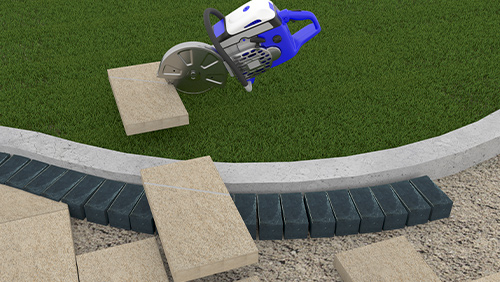
13. Cutting
Nearly every job with concrete pavers requires some cutting. Pavers are typically cut along the edge of the pavement, around planters or drainage inlets or when there is a change of pattern. OSHA requires that masonry products must be cut with a saw that is capable of cutting dust-free. This could be a wet saw or a saw with dust mitigation system. Always wear proper PPE for hands, eyes, face and lungs.
There are two methods for marking and cutting:
Method 1 – Before Border Course
- Lay the pavers until they extend beyond the line where the border course will be installed.
- Where the field meets the border, mark the cut line using a board or screed bar for straight cuts, or for curved cuts, lay out the border pavers and then score and cut with masonry saw.
- Use a cut-off saw to cut along the line you marked, removing all pieces that extend beyond that line. To minimize waste material, save the pieces that have been cut off and use them wherever possible.
- Lay the border stones back into place and install edge restraint unless working up to a curved concrete curb.
Method 2 – After Border Course
- Lay the pavers until they approach the line where the border course will be installed.
- Lay the border course and install edge restraint.
- Mark each individual paver to be cut to fit between the field and the border.
- Use a table saw or cut-off saw to cut each individual paver along the line you marked.
14. Installing Pavers of Varying Heights - Thick
THICK BORDERS OR INSETS
For borders and insets where the pavers are thinner than the main field pavers, the process is the same except this time you are adding bedding material instead of removing it.
Step 1: Lay entire project first.

Step 2: Notch out a piece of wood the same depth as the product you’re using for the border or inset.
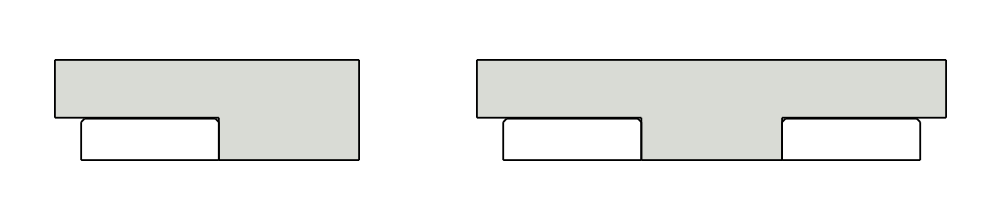
Step 3: Remove the border or inset pavers and add more bedding material. Use the the wooden guide to scrape away any excess to reach the desired height.
Step 4: Insert pavers back in place.
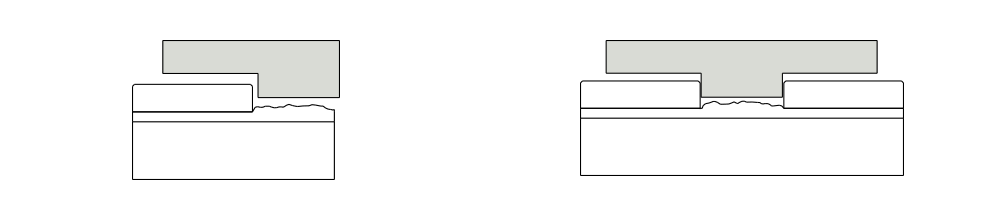
15. Installing Pavers of Varying Heights - Thin
THIN BORDERS OR INSETS
For borders and insets where the pavers are thinner than the main field pavers, the process is the same except this time you are adding bedding material instead of removing it.
Step 1: Lay entire project first.

Step 2: Notch out a piece of wood the same depth as the product you’re using for the border or inset.

Step 3: Add or remove bedding course.

Step 4: Insert pavers back in place.

16. Edge Restraint Types
All edges of a paver driveway must be restrained. Concrete street curbing and garage floors are generally already in place and serve as a restraint for some of the edges. Poured in place curbing for the sides of the driveway are a good option for irregular or curved driveways but can be difficult to precisely position for straight driveways. Most contractors prefer using invisible edge restraints because they deliver a clean visual appearance and are practical for lawn maintenance.
Concrete Curb
Plastic Edge Restraint
Reinforced Mortar Wedge

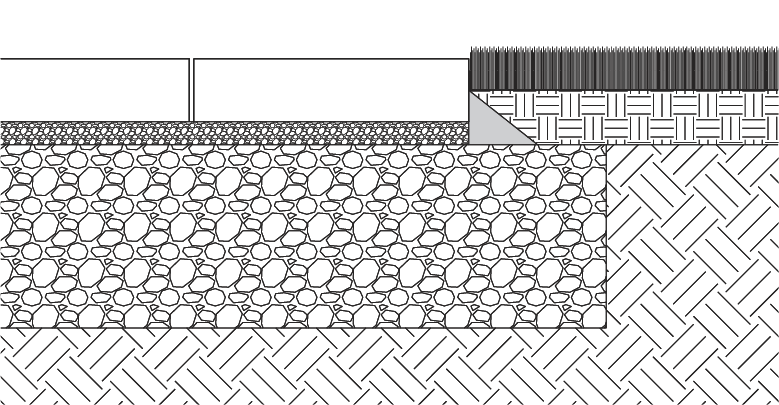
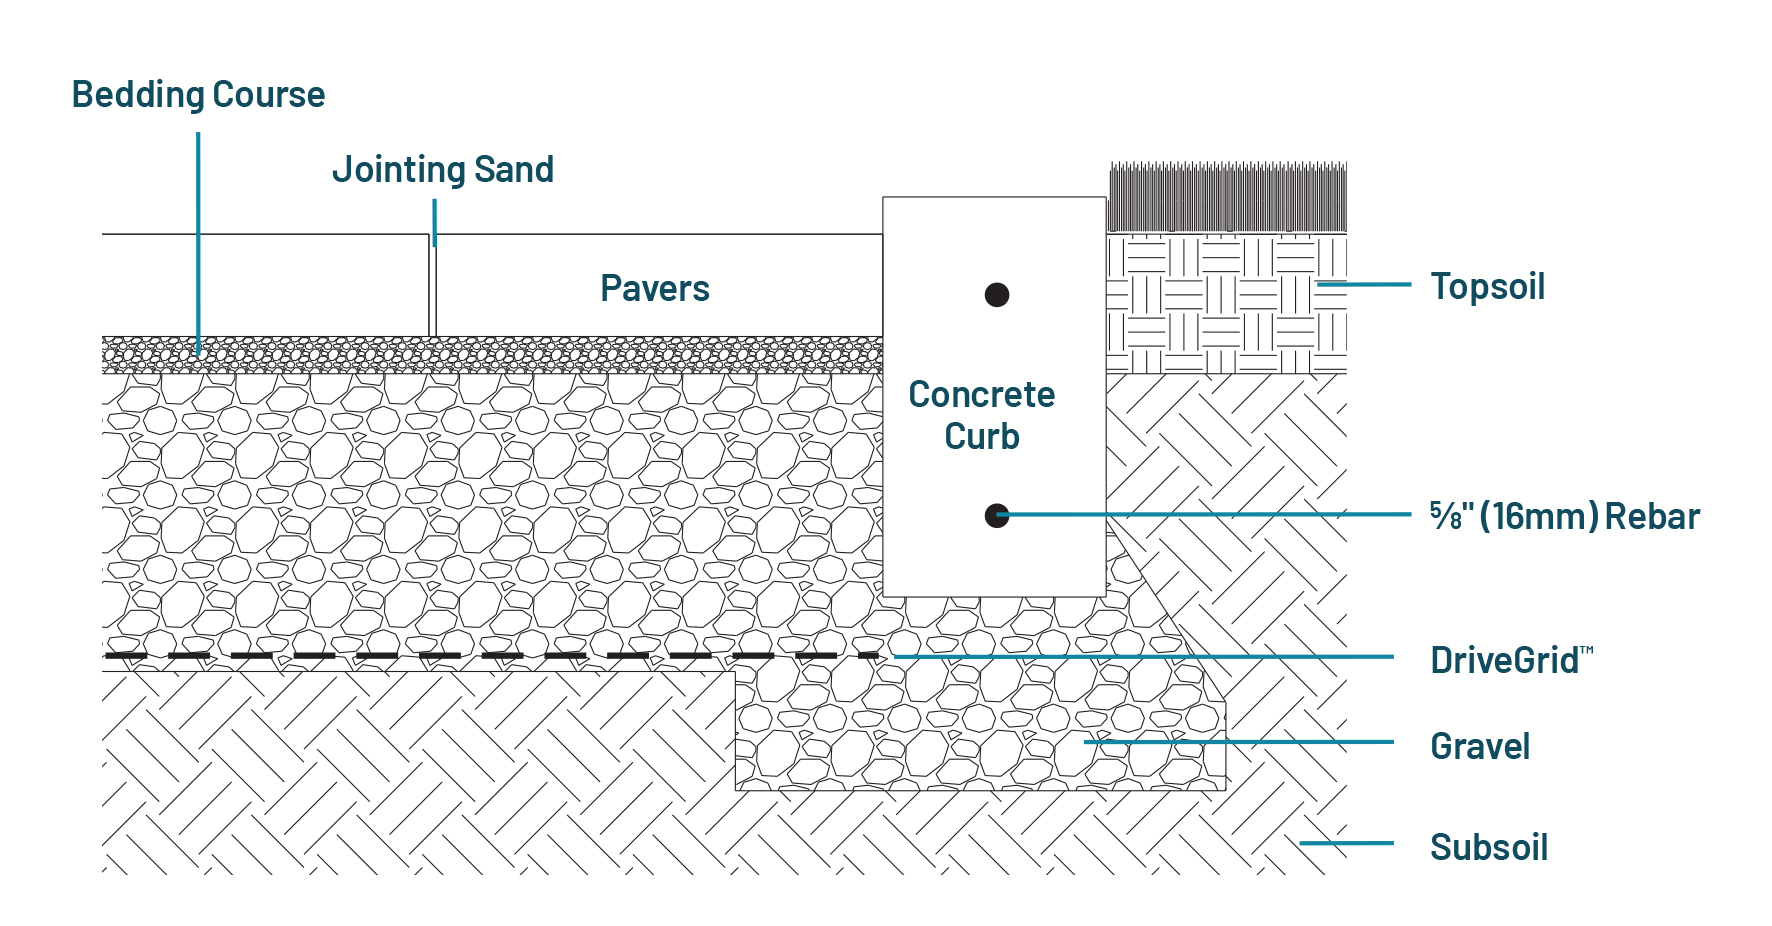
17. Concrete Curb
Concrete curbs are stronger than other types of edge restraints but they are expensive and difficult to position precisely perpendicular the garage floor.
- Step 1: You can install the concrete curb on the same base material as the driveway.
- Step 2: Reinforce with two ⅝” (16mm) rebar.
- Step 3: Outer edge must be supported by surrounding turf.
 Concrete curb with cross section" width="800" height="418" />
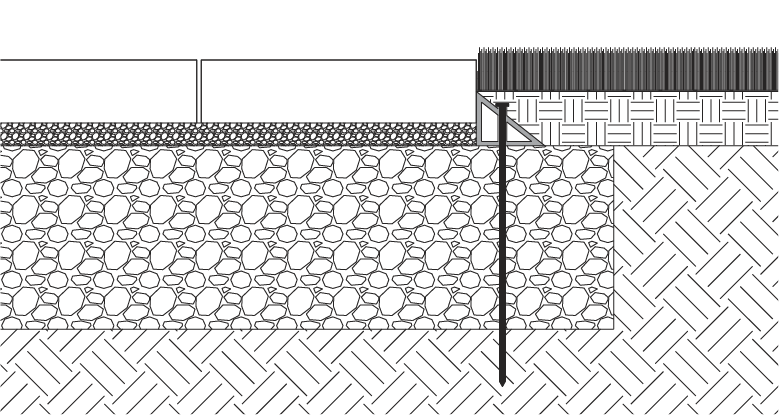
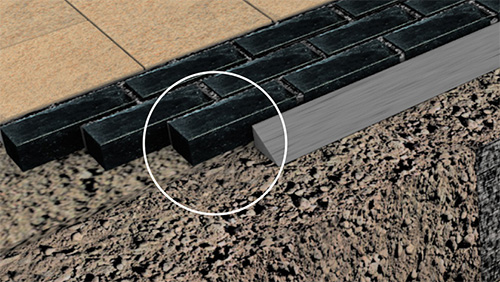
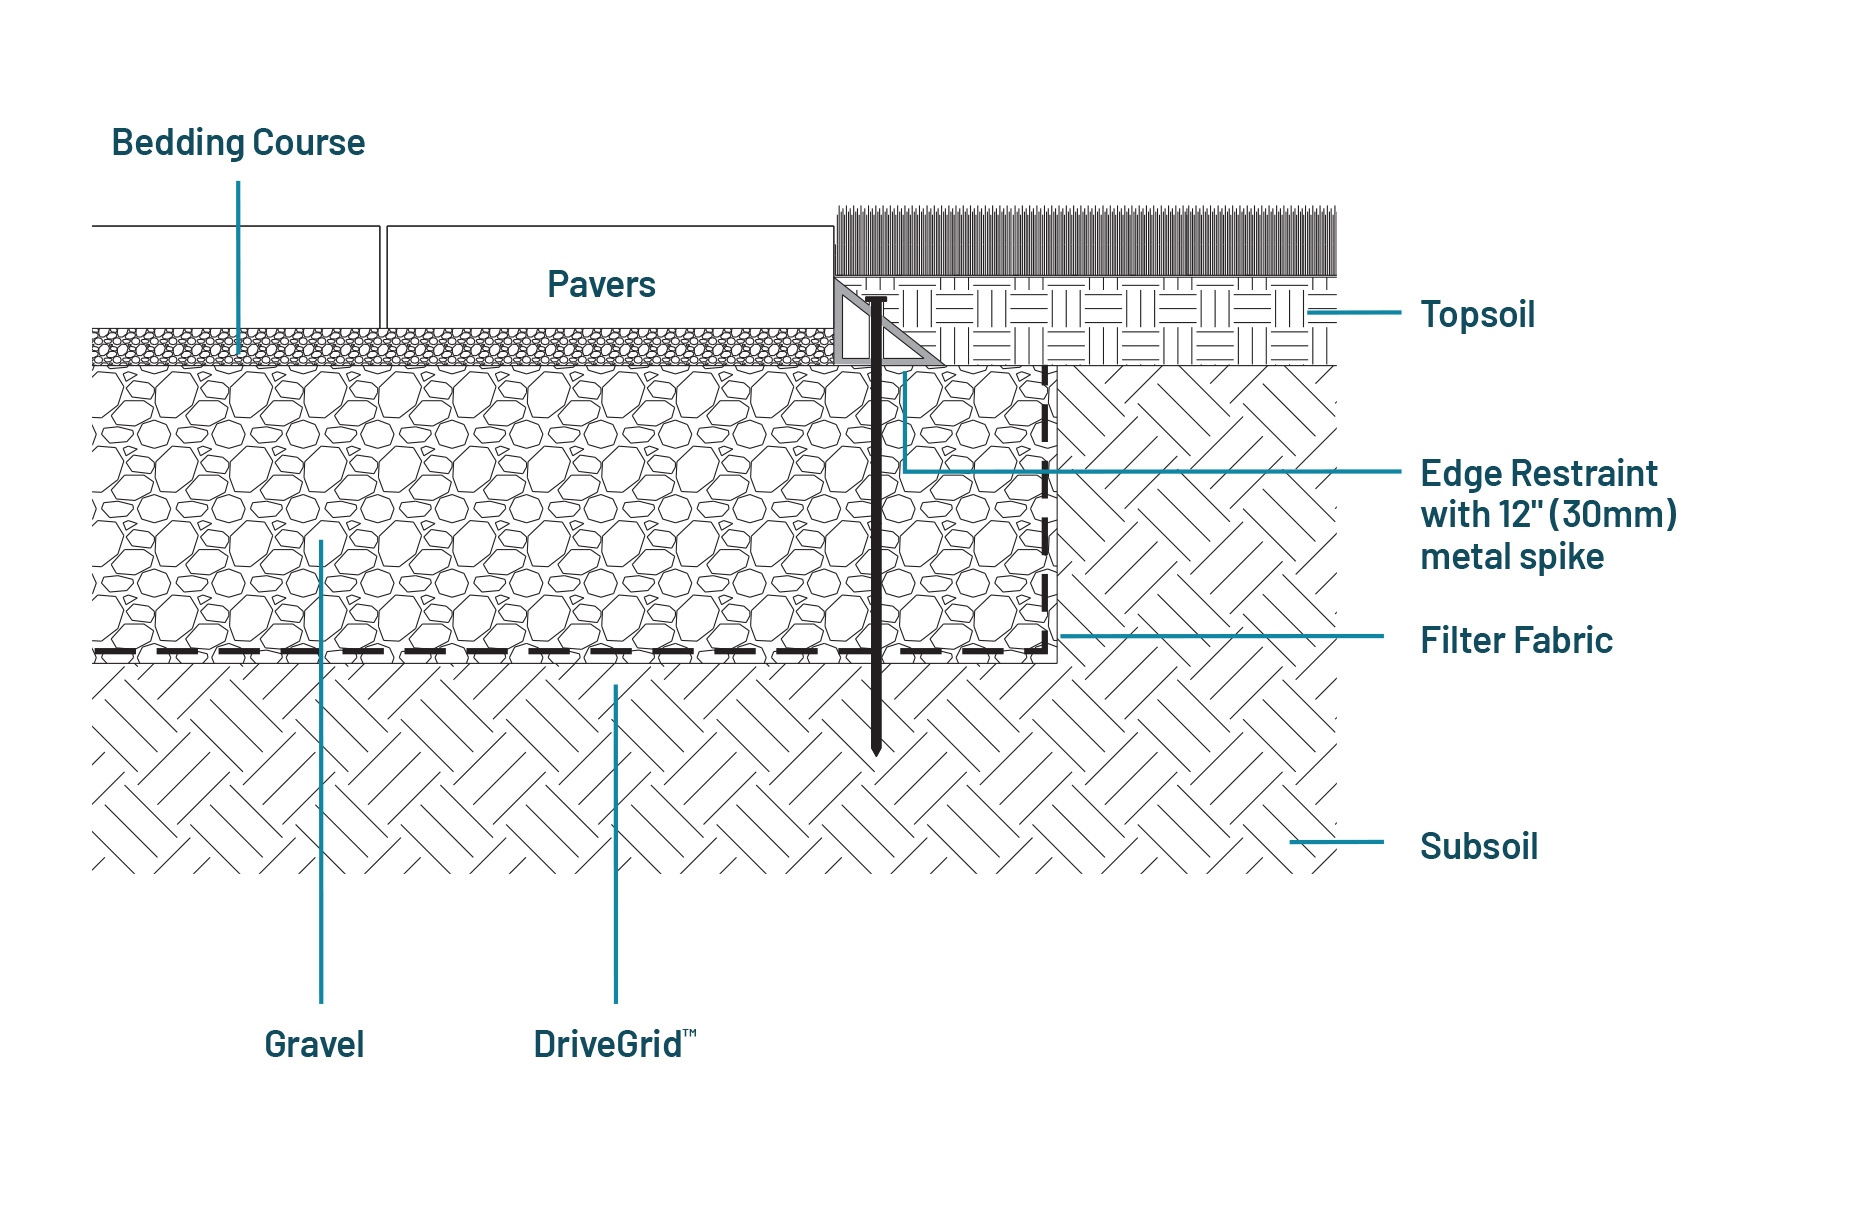
18. Plastic Edge Restraint
Concrete curb with cross section" width="800" height="418" />
18. Plastic Edge Restraint
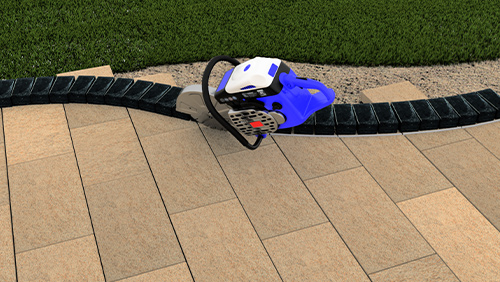
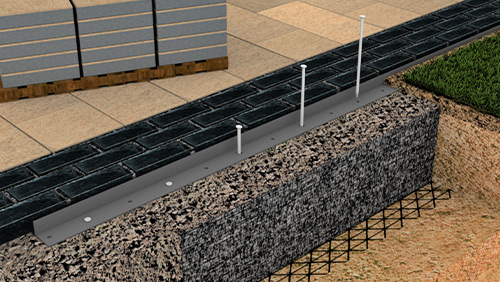
Plastic edging is popular because it is fast and practical. However, it’s important to always use a quality product; avoid cheap, flimsy brands of plastic edging.
- Step 1: Install on base course not bedding course.
- Step 2: Install edge restraint tight up against the pavers.
- Step 3: Spike in using 12″ spikes.
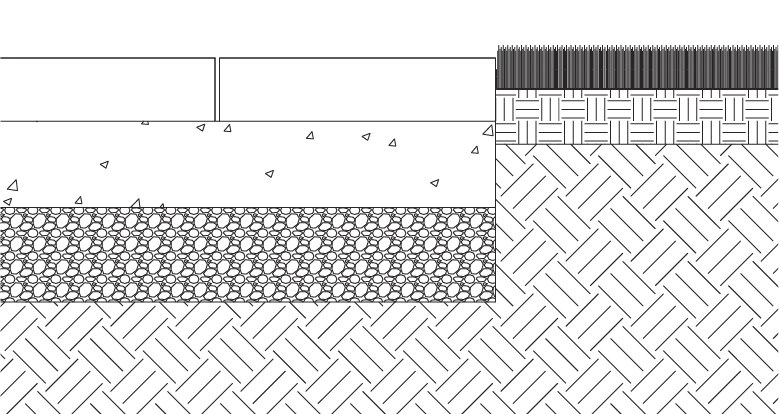
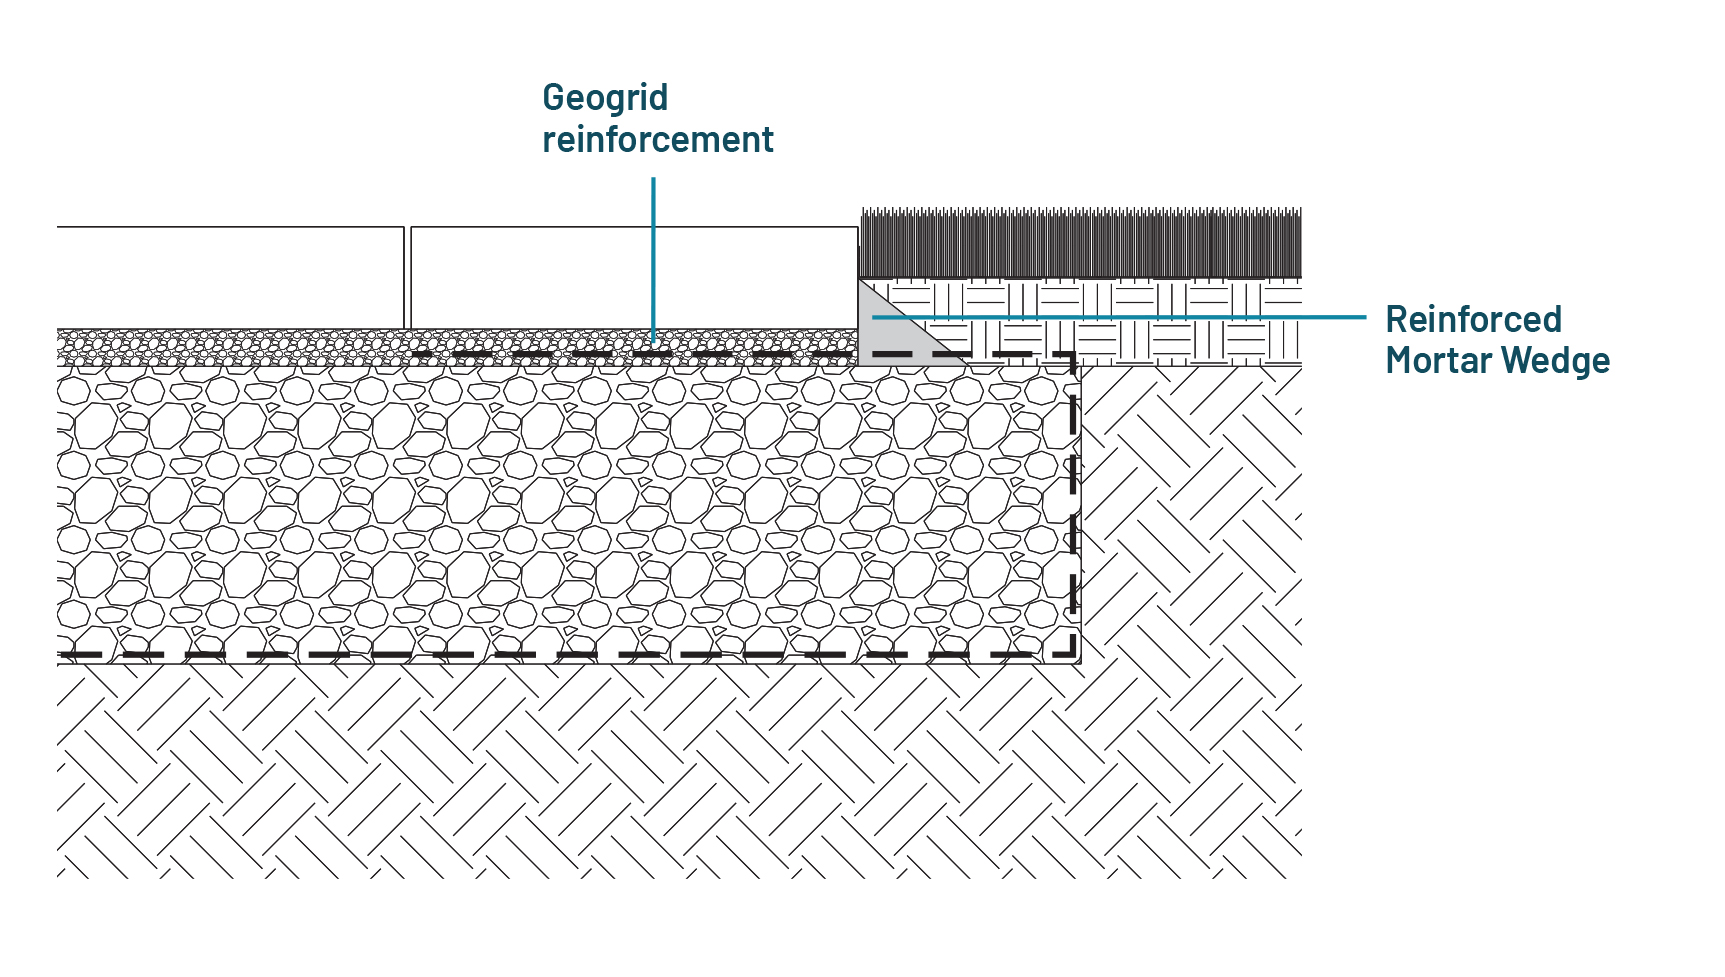
 19. Reinforced Concrete Edge Restraint
A reinforced concrete edge can be troweled along the edge of the perimeter. This works well for almost all paver applications, straight or curved.
- Step 1: Install directly on base course not bedding course.
- Step 2: Use only fiberglass reinforced mortar/concrete mix.
- Step 3: Use Geogrid to add additional stabilization especially for open-graded bases and bedding courses.
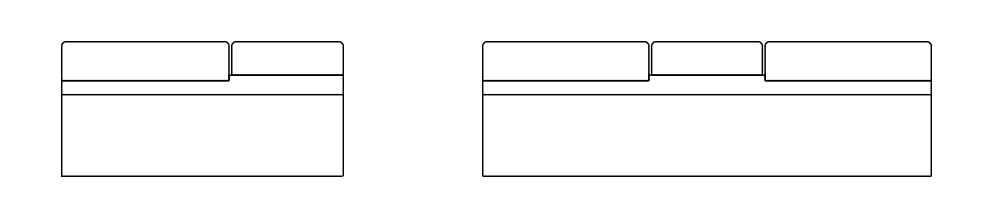
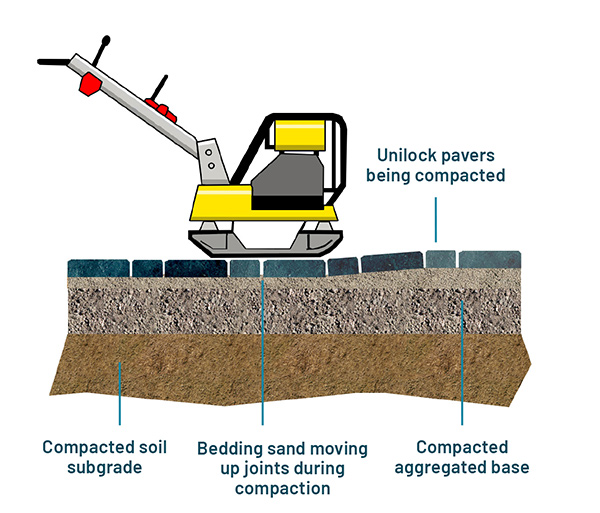
 20. Paver Compaction
Compacting does two important things:
- Removes slight height variations between the individual pavers, making for a smooth surface.
- Sets the pavers into the bedding course if sand bedding was used.
IMPORTANT: DO NOT put any type of sand in the joints, or on the surface, before paver compaction. This will prevent proper leveling, and could result in scuffing and scratching. The surface must be free of all debris and sand prior to compacting.
Procedure
Check entire area for color blending. Move any pavers around to improve the blend. All edge restraints must be in place before compacting. Compact in three directions for a minimum of three passes total.
IMPORTANT: To prevent scuffing or scratching of the paver surface use a rubber roller compactor, or a vibratory plate compactor with a polyurethane pad connected to the bottom.
21. Joint Sand
VISUAL PAVER INSPECTION
Before installing jointing sand, the entire project should be visually inspected to ensure any damaged pavers are replaced. This is also the final opportunity to ensure that color has been properly blended throughout the project. Pavers can be removed and rearranged using various mechanical and pneumatic lifting tools.
SAND TYPES
Unilock recommends that you install a jointing sand that conforms to ASTM C936 (semi-coarse sand). Regular sand can be used, but polymeric sand is the most popular material today because it prevents erosion, weed growth and insect infestations. Polymeric sand contains additives that form a binding agent when exposed to water, fusing sand particles together so that pavers are locked in place.
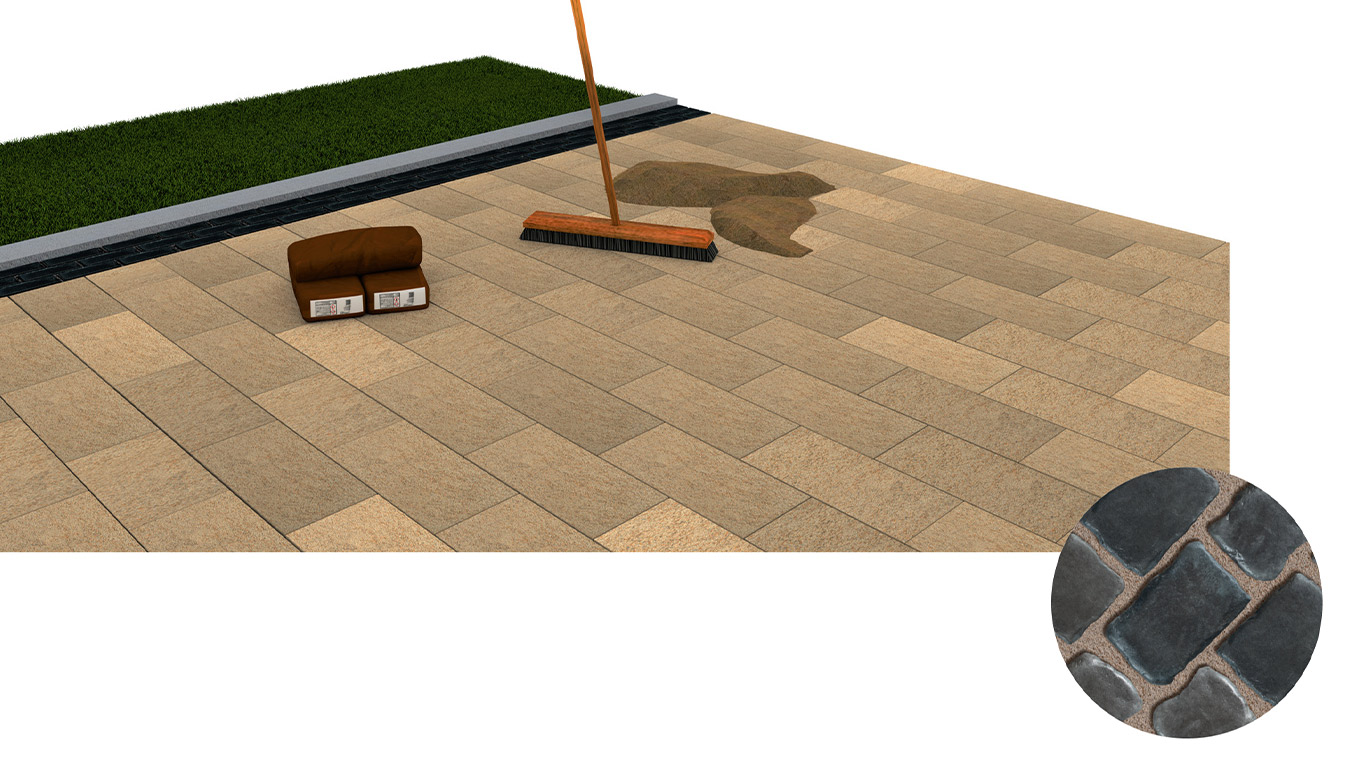
22. Installing the Sand / Sealing
Installing the Sand
- Choose a day when no rain is expected.
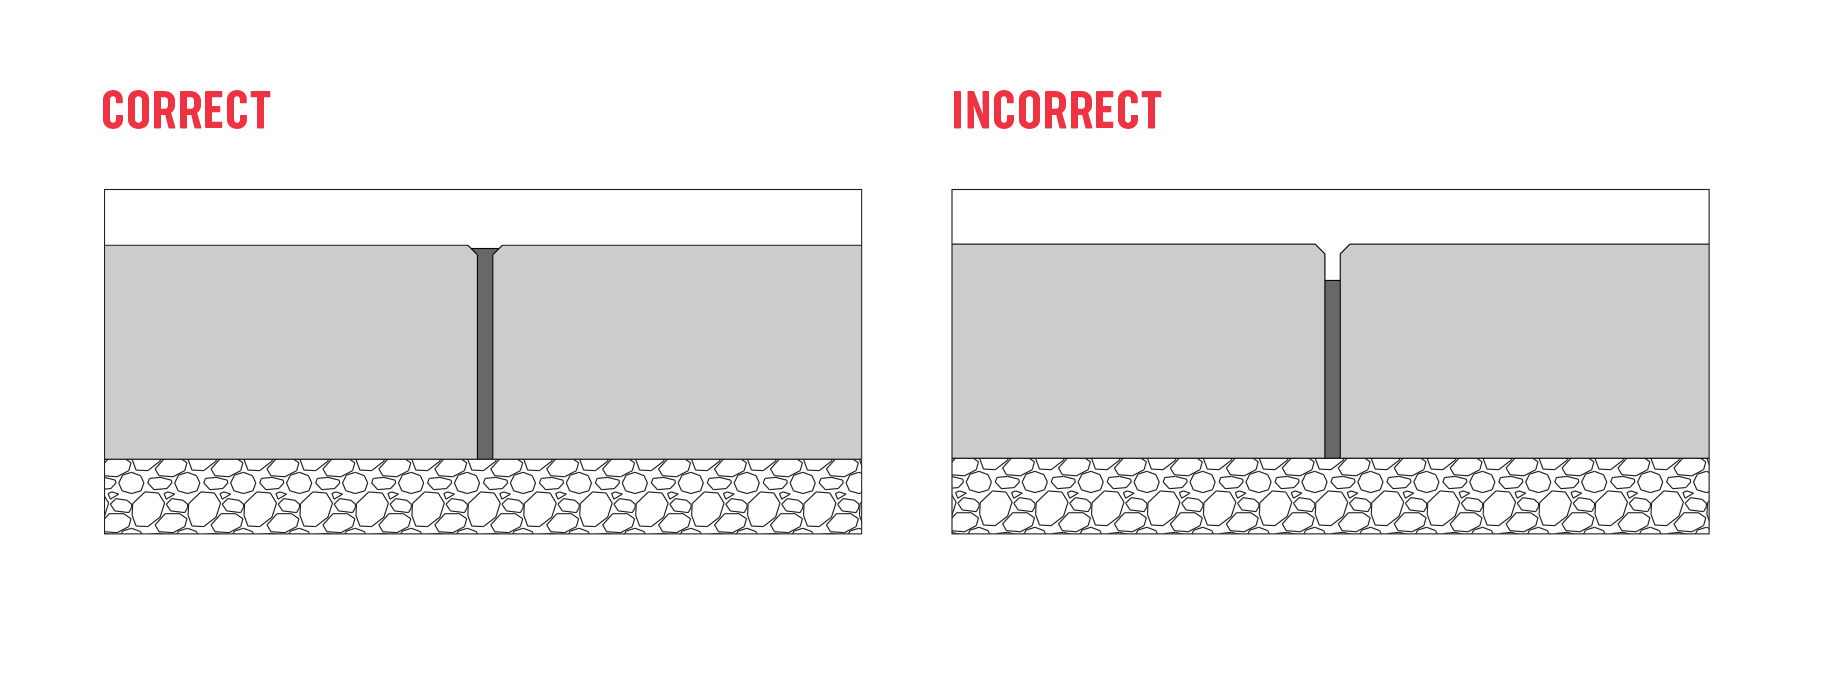
- Follow directions on product label exactly.
- After sweeping and consolidation, ensure that the sand is approximately ⅛” below the level of the chamfer of the paver or the surface of the paver if there is no chamfer.
- Never compact or activate polymeric sand with water until entire surface is clean and free of dust.
Sealing
Sealing is not required. However, some clients prefer the sheen of sealed pavers or want to add an extra layer of protection for pavers in high traffic locations. Pre-sealed pavers are available from Unilock, or you can apply an after market sealer.
Ask your local Unilock Dealer for the appropriate sealer for your product and application and be sure to follow the product’s directions exactly.
23. Congratulations - your driveway is complete!
For more help designing and constructing driveways, contact your local Unilock Territory Manager (1-800-UNILOCK) to arrange a phone consultation or site visit.
